
Your shopping cart is empty.
Background Noise Reduction With Ableton Live (All Solutions!)


Last updated on September 14 2022
It can be pretty challenging to cancel out all background noise while recording.
Hiss from your audio interface, hum from the computer's fan, guitar buzz, microphone noise, or general surrounding commotion can ruin your audio.
If you can’t fix this before you start recording, the next best option is to do it by editing your audio recording afterwords.
But that’s not always a piece of cake either!
The best way to reduce unwanted background noise with Ableton live is by using either a ‘De-Noiser’ or ‘Noise Gate’ device. These do different things but both can help to lessen and even completely remove unwanted background noise.
In this article, I’ll explain the various ways that you can remove background noise in Ableton Live.
Here’s what you’ll learn in this article:
- The Difference Between a Noise Gate and De-Noiser
- Using Ableton Live's Stock Devices To Remove Background Noise
- De-Noising in Ableton Live With 3rd Party Plugins
- Free 3rd party De-Noising Plugins for Ableton Live
- Premium De-Noising plugins for Ableton Live
The Difference Between a ‘Noise Gate’ and ‘De-Noiser'
The two ways background noise can be removed using Ableton Live are by using either a ‘Noise Gate’ or ‘De-Noiser’.
It’s important to understand that both of these are very different.
Lets take an audio recording of you speaking as an example, you’ve setup your microphone in a quiet room and recorded yourself talking,
But when listening back, you can hear a hiss/hum or other unwanted sounds in the local environment.
In this case you will need to turn to one of the following solutions.
Noise Gate
A Noise Gate works by removing noise in the parts of the audio where you are not speaking. In other words, it removes noise from the areas in between the actual audio you’re trying to capture.
This works ok as when you’re speaking the background noise is less noticeable so you can get away with it. But, this may not be satisfactory to your situation.
De-Noiser
On the other hand, a De-Noiser works by reducing or even removing the interference on the audio itself.
In most cases, you only need to be using a de-Noiser to remove all kinds of background noise and have smooth audio.
Using a Noise Gate without a De-Noiser is a bit pointless as your audio recording will still have background noise in parts where any wanted audio is being played.
Using Ableton Live's Stock Devices To Remove Background Noise
Ableton Live has powerful built-in tools for Noise Gating and De-Noising your audio recording.
This means you don’t need to use a 3rd party vst/plugin for basic noise reduction!
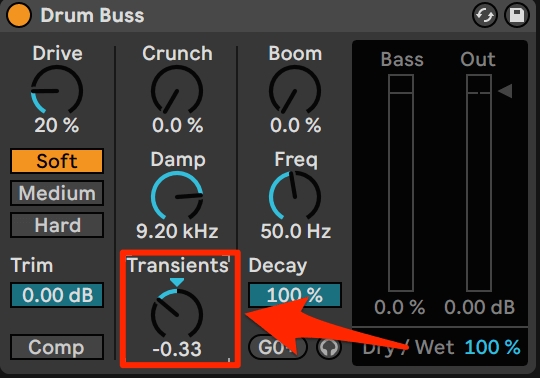
The ‘Drum Buss’ Audio Device
This device, as its name suggests, is used specifically as a drum processing plugin.
But surprisingly, it works well to De-Noise echoey audio as well as reducing unwanted noise from it.
How to De-Noise with the Drum Buss
As you turn the Transients control counter clockwise, you should start to notice echo/ reverb and noise in your audio begin to disappear. If you turn it to the right, it will enhance those noises.
The Gate Audio Device
The Gate device works if you want to Noise Gate your audio (as described above).
Note that this device is only available in the full version of Ableton Live, not in the Lite version.
How to Reduce Background Noise with the Gate device
We have already discussed what a Noise Gate is. So, to do this with the Gate plugin inside Ableton:
Add an instance of Gate to the audio track’s device chain.
Turn the knob named ‘Return’ to 0.00db. Then use the ‘Threshold’ knob to set the db level at which the Gate will cut the audio out.
You can do this visually by playing the audio clip, then look at the ‘Gate Activity’ part of the device.
You will see a moving ‘peaks’ and ‘valleys’ style view. You want to set the blue threshold line to below the level which the audio you want to keep, outputs at.
Anything below the blue line will be muted, which will effectively cut out noise around your target audio.

Note, if your audio is being clipped off at the start or end, due to the gating effect, you can ease this by adjusting the attack/sustain/delay knobs to taste.
De-Noising in Ableton Live - With 3rd Party Plugins
Ableton’s built in Devices are powerful, but they may not quite do the job for your specific circumstance..
In this case, it’s worth seeking out a third-party plugin/sample editor.
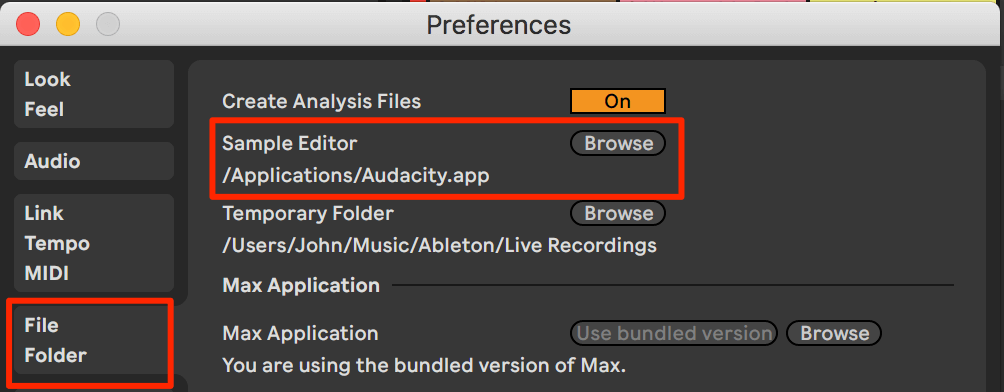
It’s actually possible to setup 3rd party plugins as the default ‘sample editor’ for your installation of Ableton live. Here are the steps to do it:
- Go into Preferences in Ableton Live
- Click on File/Folder.
- You should be able to see Sample Editor under there.
- Then, click on Browse.
- Browse through your Applications and Select whichever you want.
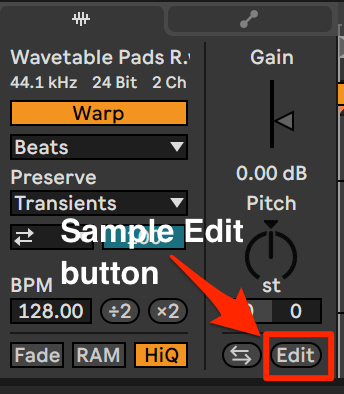
To edit audio in your plugins and transition it into Ableton you will need to:
- Select the clip in Ableton Live so the ‘clip view’ is displayed and click the ‘Edit’ button.
- This will automatically open the configured Sample Editor.
- After editing the sample, click Save or Export as WAV or Overwrite Original File.
- This will be a destructive edit so make sure that all your changes are confirmed before saving the file.
- Once the edited file is saved, close your plugin, and that audio file will be updated in Ableton Live.
Third-party plugins come in both free and premium options so, let’s discuss both and you can decide which one will best fit your needs.
Free 3rd party De-Noising Plugins for Ableton Live
Free De-Noising plugins include:
Audacity
Audacity is the first one to be mentioned and for good reason. It’s a very popular free audio editor that you can set directly in Ableton as your default sample editor.
Making it seem less to switch to (see above for the steps).
De-Noising Audio With Audacity As Ableton’s Sample Editor
After setting up Audacity as your sample editor in Ableton, you can remove background noise with it by doing the following:
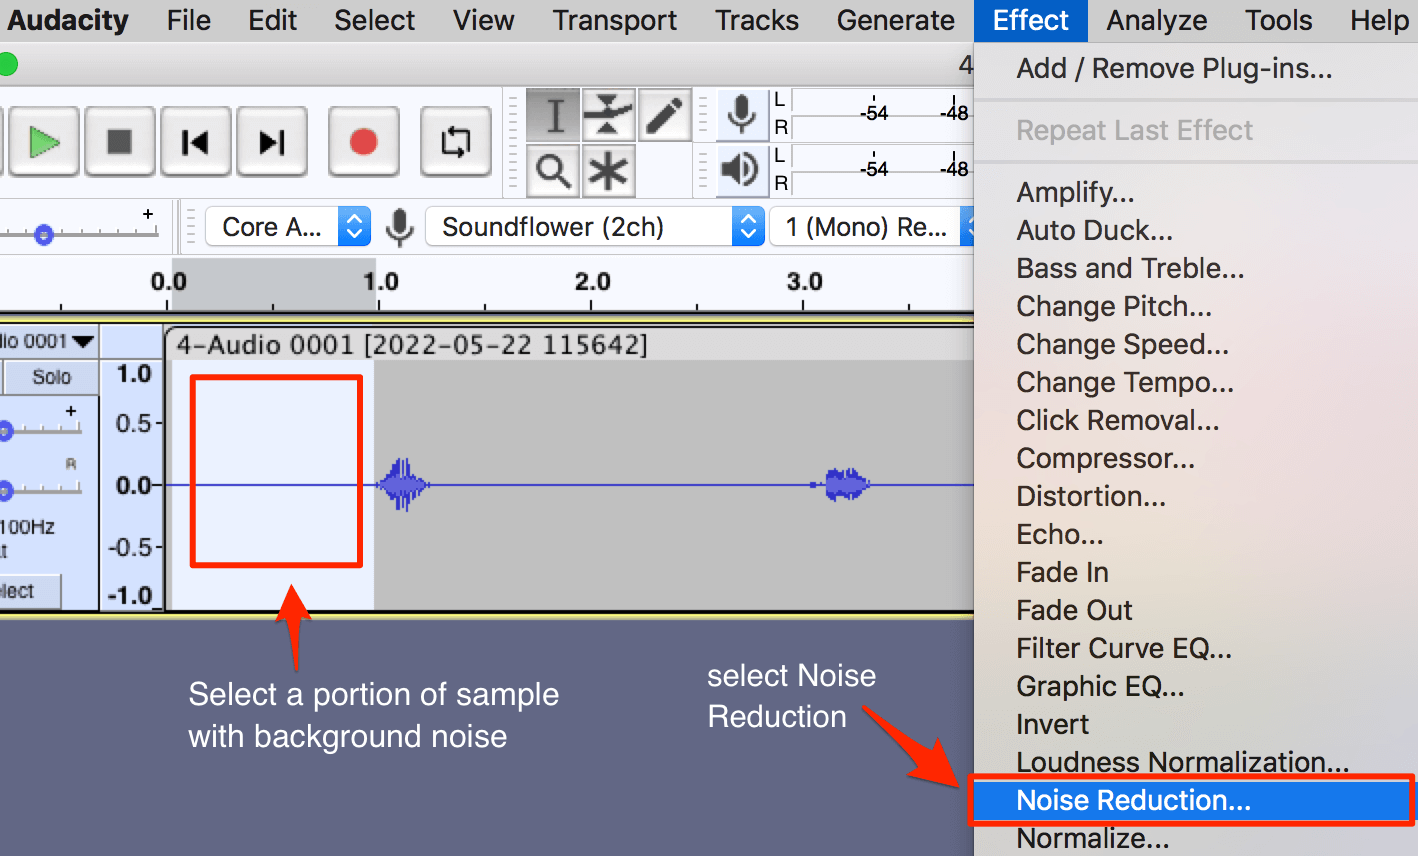
Open the clip view, click the ‘edit’ button (if everything is configured correctly, this will automatically open the clip directly in Audacity)
Select a portion of the sample that has background noise but no desired audio.
Go to ‘Effect’ and ‘Noise Reduction’.
Click on ‘Noise Profile’ to get the profile of the selection.
Then select the entire audio,
Go back to Noise Reduction and tweak the decibels, sensitivity, and frequency smoothing bands to preview your ideal recording.
Once you are happy with it, hit ‘OK’.
Now, save that file and when you go back into Ableton Live, that noisy audio will have been replaced by the smooth one.
Bertom Denoiser
Bertom Denoiser is another wonderful free tool that is simple to use but is still very efficient.
If you need a plugin to clear up minor issues quickly then this should be your go-to.
It has 5 sliders on different frequencies which you can use to adjust the overall sound.
There is also a separate slider for Threshold which you can set according to the background noise you want to remove.
You can also use dials to adjust high and low frequencies.
Premium De-Noising & Noise Reduction Plugins
If you are committed to getting clean, crisp audio then you might want to look into some premium options for denoising.
Izotope RX
Izotope’s RX 10 is a tool designed for all your post-production needs which primarily includes removing background noise.
You can get a 30-day free trial to test it out but after that, this is a paid tool.
In just one click, you can remove most of the background noise automatically.
But, with their many features such as Ambience Match and Dialogue Isolate, you can take your audio to the next level.
RX 10 supports Ableton Live as a host so your audio will transition smoothly between the two software.
Waves Z-noise
Lastly, we have got the Z-noise plugin from Waves.
The display shows your audio in four stages - Output, Input, Noise Profile, and EQ profile.
A feature called Exclusive Extract works by creating an audio profile of the noise and excluding it from the audio.
You also get dynamic control which includes Threshold, Reduction, Attack, Release, Knee, and Transients.
By using some or all of these various features, you will end up with excellent final audio.
Conclusion
Removing background noise is a tricky task but by using Ableton Live’s built-in plugin or even third-party plugins, it’s possible to clean up your audio in no time.
So hopefully one of these plugins suits your needs!
After you have removed noise, it may be then worth normalizing the audio, to ensure you have nice leveled sample.
You can use our Ableton MIDI tool to create script for controlling your De-Noiser directly from your MIDI controller. Check out Control Surface Studio to get started.
We have lots more on Ableton Live, check out our blog.