
Your shopping cart is empty.
"Kuala" - Hercules P32 DJ for Ableton
Ableton Midi Control Surface Script
Ableton Midi Control Surface Script


Technical Overview:
- Premium built midi control script
- Purpose built for the Hercules P32 DJ midi controller
- Instantly automaps to the Hercules P32 DJ
- Loaded with over 90 essential ableton controls
- Full LED feedback
- Direct tempo & loop length display
- Performance enhanced Ableton workflow
- 4x4 session box control
- Control the currently selected track
- Ableton DJ controls
- Play drum racks and instruments
- Includes all future updates
- Editable with Remotify Pro (What is this?)
- Works with Ableton 9 and 10 only. (For Ableton Live 11, see Control Surface Studio and our available Hercules P32 DJ Controller Template)
- Works on Windows & Mac
£15.00
£15.00
Just like the Hercules P32 DJ itself, our midi script experts have designed “Kuala” to blur the lines between producing and djing with Ableton in an incredible new way. Control your clips in 2 essential ways at the same time; tap out beats and melodies with the right set of 16 pads, while creating, launching and editing multiple clips in your session with the left set of 16 pads. This constant control over multiple clips will enable you to get those great new ideas down faster and create more fluid performances. But that’s just the start of what this script can do...
Details
4x4 Clip and Track Controls

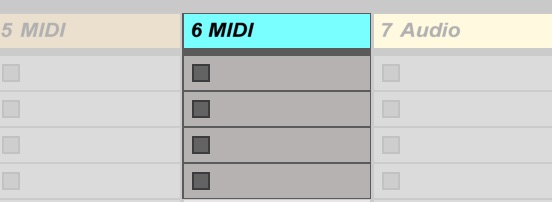
4x4 Session Box (Red Box)
Kuala gives you a 4x4 session box which you will see displayed inside Ableton. This provides control over 16 clips, across 4 tracks/channels at any one time. The selected clips are controlled using the left set of 16 pads on your Hercules P32 DJ. You also get various controls for the 4 tracks, giving you the ability to mix sets of 4 tracks without needing to switch between them.
Clip Creation & Launching
When "HOTCUE" is selected, the 16 pads control clip creation/recording and launching of the 16 currently highlighted clips.
When “LOOP" is selected for the left set of 16 pads...
4 Track Mute Control
The top 4 pads control mute buttons for the 4 tracks contained within the session box, pads display purple when the track is active and off when the track is muted4 Track Solo/Cue Control
The second row controls solo/cue for the 4 tracks, pads display blue when solo/cued or off4 Track A/B Assign
The third row control A/B select for each of the tracks - these are used to assign tracks to the left and right positions of the crossfader, essential for DJ style mixing. Pads display blue when assigned to A, purple when assigned to B and off when not assigned to any.4 Track Stop Button Control
The bottom 4 are stop track buttons. They display red when the track is stopped and purple when the track is playing.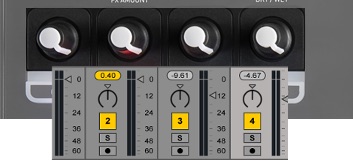
4 Track Volume Control
Located above the left 16 pads, the 4 encoders control volume for each track contained within the session box (red box).
Move Your Session Box
With Kuala, you're not limited to a single set of 4 tracks, oh no! You can move the session box around your entire project, giving you access to unlimited tracks. All in groups of 4 tracks. The left “CUE” and “PLAY" buttons move the session box left and right. Holding the left shift button changes them to up and down.
4 Track - Track Select
The left set of 4 LED buttons control "track select" for each track inside the session box. They display red when the track is selected or off when not selected. If you need further controls for a specific track, select it here then use the central mixer for more in-depth selected track controls (see "selected track control" section for details).
Free Pads For Further Customising
“SLICER” and “SAMPLER” modes on the left 16 pads are free. This gives you a total of 32 pads that you can add your own extra controls to. You can do this using Ableton’s internal midi mapping mode or load your script into Remotify’s script creator app and directly customise it (remotify pro account required).
Automatically Arm Tracks
When you select a track, Kuala automatically arms it inside Ableton. As soon as you select a track which contains a drum rack or instrument, you can instantly play midi notes into it. A great little workflow improvement!Shift Controls

There are 2 “SHIFT” buttons on the Hercules P32 DJ. When pressed, they change the functions of certain buttons (detailed with each control on this page). It's important to note that the left "SHIFT" only affects controls on the left side of the controller and right "SHIFT" changes functionality for the right side.
Tempo/BPM Control

Tempo & Fine Grained Tempo Control
The left "SIZE/ADJUST" encoder controls the tempo of your project. Turning the encoder increases and decreases the tempo by 1 BPM for each “click" on the encoder. When the left ’shift’ button is held down, the encoder increases and decreases the tempo by 0.10bpm, allowing for more fine grained control.
Tempo Display
The display next to the Tempo encoder displays your project's current tempo. As the screen is only capable of displaying 2 numbers, we've improvised a little. When the tempo is under 100 it simply displays 2 digits When the tempo is between 100 & 199 it will display a dot between the two digits (i.e. a tempo of 127bpm = 2.7) When the tempo is between 200 and 299, it will display a dot after the digits (i.e. 225 = 25.) When the tempo is 300 and over, it displays two dots (i.e. 350 = 3.5.) When the left shift button is pressed, the display switches to show the current decimal value of the tempo.Transport & Recording

Arrangement Record
"REC" turns Arrangement record on and off - the button will light up when record is enabled.
Session Record
"SLIP" turns session record on and off, same as above, the button will light up when session record is enabled. When session record it turned on, any notes you play with the right set of 16x16 pads will be immediately recorded into the current clip.
Metronome
The left “SYNC" button turns the project's metronome on and off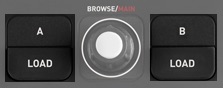
Undo / Redo
"LOAD A" will undo your last change, "LOAD B" will redo your last change
Play & Stop
The right "CUE" button, stops playback, The right "PLAY" button starts playbackSelected Track Control
As well as 4 track session box control, "Kuala" provides a detailed collection of mixer controls for the currently selected track inside Ableton, giving you deeper control over a specific track whenever you need it.

Selected Track Navigation
The central "BROWSE/MAIN" encoder moves the selected track left / right - 1 track per encoder click.
Send Controls
The top 4, central knobs control the first 4 sends of the selected track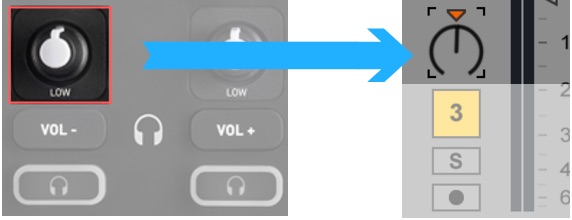
Pan Control
The bottom left knob controls pan for the selected track
Solo/Cue Monitor
The left headphone button controls solo/monitor for the selected track.
Track Activate/Mute
The right headphone button mutes and unmutes the selected track. The LED will be off when a track is muted and on when track is unmuted.
Selected Track and Master Volume Controls
The left fader controls volume for the selected track, The right fader controls master volumeDJing Controls

Crossfader
The crossfader controls Ableton’s internal crossfader. Any tracks which you A/B assign will be set to the left and right positions of the crossfader (see "4 Track Control Of Mute, Solo/Cue & A/B Track Assigning" regarding where to do this), allowing for dj style mixing of multiple tracks.
Cue Volume
The bottom right knob on the central mixer controls the Cue Volume. You can turn cue on/off for tracks in 2 ways. From within the session box (see "4 Track Control Of Mute, Solo/Cue & A/B Track Assigning") or on the selected track (see "Solo/Cue Monitor" in "selected track control"). Note: You still have access to the P32 DJ's built headphone volume functionality with the vol+ and vol- buttonsDevice Control

Device Parameters
The 4 knobs on the right of the P32 DJ control the first 4 parameters of the selected device. Holding down the right “SHIFT” button changes them to control the second 4 parameters of the selected device
Device Select
The 4 LED buttons above the right knobs allow you to select the first, second, third and fourth devices on the currently selected track - if one of these devices is currently selected, the repsecitve button's LED will light up.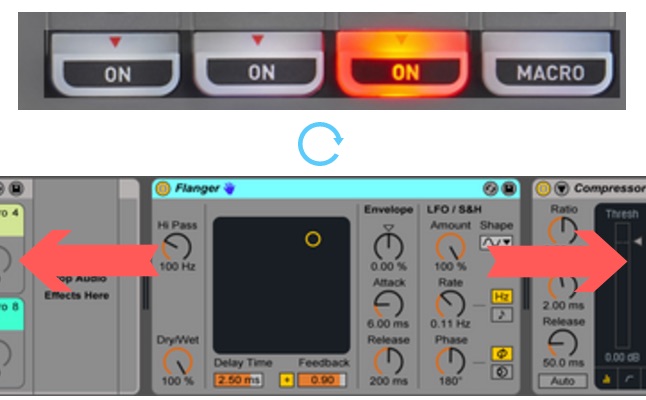
Device Navigation & Banking
When the right "SHIFT" button is pressed, the first 2 LED buttons navigate to the previous and next devices on the selected track. They will display red if there are devices to move to and turn off when there are no more devices in that direction. The second 2 buttons bank up and down through sets of 8 device parameters within the currently selected device. They will display red if there are more sets of parameters to move to within the selected device and turn off if there are no more available.
Device On/Off
Pressing the top right "FILTER/MOVE" encoder switches the currently selected device on and off.Get inside your Clips

Play Drum Racks & Instruments
The right set of 16 pads use the P32’s built in functionality to play drum racks & instruments of the selected clip. Use this in-conjunction with Kuala's clip creation and launching functionality for an optimised writing workflow.
Display Clip Details
The right "SYNC" button displays the detail view of the selected track's currently playing clip
Loop Length Control
Once you've recorded a clip you can quickly change its length with the top right "SIZE/ADJUST" encoder. Turning it to the right doubles the length of the selected clip and copies all of the notes so you instantly have a longer loop for i.e. adding fills to. Turn it to the left and the loop's length is halved.Loop Length Display
The display next to the right "SIZE/ADJUST" encoder shows you the loop length of the currently selected clipReviews

Kuala brings a real plus to my workflow, no need to remap my P32 with every new project. Clip launches, sends, macro knobs and volume levels are under control.
Viikk