Your shopping cart is empty.
How to set a single button to control Ableton Live’s Play & Stop
.jpg?itok=ynHuJmhA)

Last updated on March 12 2020
Combining Play and Stop into one 1 button on your controller is a great space saving trick. Why do they need to be separate anyway? lets see how this can be done with an Ableton Script built in Control Surface Studio.
Although they are separate mapping types in Control Surface Studio, its pretty simple to set play and stop to the same button.
There are a couple of ways that this can be achieved which we will go through below.
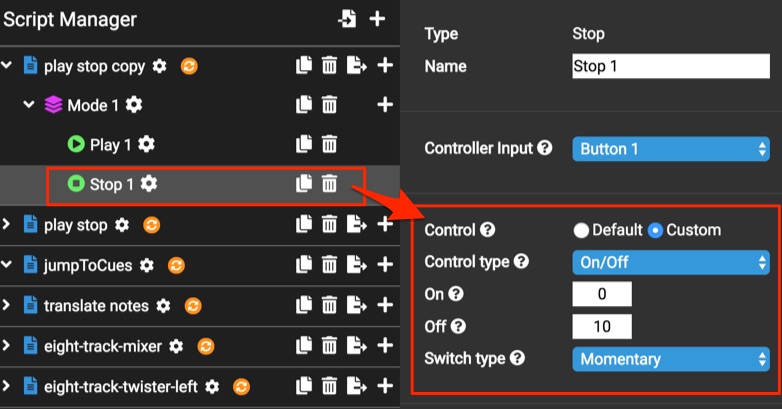
 For the off value, set it to a value other than the button’s ‘off’ velocity value, this will prevent the play mapping from firing when the ‘off’ value is received.
For the Stop mapping do the same as above (change the ‘control’ option to custom, set ‘control type’ to on/off) but for the ‘On’ value, you’re going to set this to the button’s ‘off’ velocity value (which is usually 0 for buttons). This tells the Stop mapping to fire when it receives 0 from the button, essentially reversing your button’s functionality for this 1 mapping only.
Finally, just like you did with the Play mapping you now just need to set the Stop mapping’s ‘Off’ value to any velocity value which the button will never send (for buttons this can usually be anything other than 127 or 0).
For the off value, set it to a value other than the button’s ‘off’ velocity value, this will prevent the play mapping from firing when the ‘off’ value is received.
For the Stop mapping do the same as above (change the ‘control’ option to custom, set ‘control type’ to on/off) but for the ‘On’ value, you’re going to set this to the button’s ‘off’ velocity value (which is usually 0 for buttons). This tells the Stop mapping to fire when it receives 0 from the button, essentially reversing your button’s functionality for this 1 mapping only.
Finally, just like you did with the Play mapping you now just need to set the Stop mapping’s ‘Off’ value to any velocity value which the button will never send (for buttons this can usually be anything other than 127 or 0).
 I’m going to name the first Reaction ‘start playback’,
Set the Listener to my controller’s button ‘button 1
I’ll add a condition, select ‘is playing’ == Input False. This checks the current status of playback when the button is pressed.
And in the ‘reactions’ section, set it to: start playing () Input
I’m going to name the first Reaction ‘start playback’,
Set the Listener to my controller’s button ‘button 1
I’ll add a condition, select ‘is playing’ == Input False. This checks the current status of playback when the button is pressed.
And in the ‘reactions’ section, set it to: start playing () Input
 In the second Reaction I’ll name it ‘stop playback’
Listener is ‘button 1’
Add 1 condition which says: is playing == Input True
ANd then in the reaction add: stop playing () Input
In the second Reaction I’ll name it ‘stop playback’
Listener is ‘button 1’
Add 1 condition which says: is playing == Input True
ANd then in the reaction add: stop playing () Input
 If you're using a momentary button then what we we have so far will start playback when you press the button and it will stop playback when you release it.
If you want your button to start playback on first press then stop playback on second press, add another condition to both reactions which checks that the current value of your button is the 'on' value of your button. This will prevent the reaction from firing when the button sends the off value.
In the following image I have added the required condition: Button 1 .cur_val == input 127.
The text '.cur_val' is short for 'current value' and tells the script to check the button's current value.
If you're using a momentary button then what we we have so far will start playback when you press the button and it will stop playback when you release it.
If you want your button to start playback on first press then stop playback on second press, add another condition to both reactions which checks that the current value of your button is the 'on' value of your button. This will prevent the reaction from firing when the button sends the off value.
In the following image I have added the required condition: Button 1 .cur_val == input 127.
The text '.cur_val' is short for 'current value' and tells the script to check the button's current value.
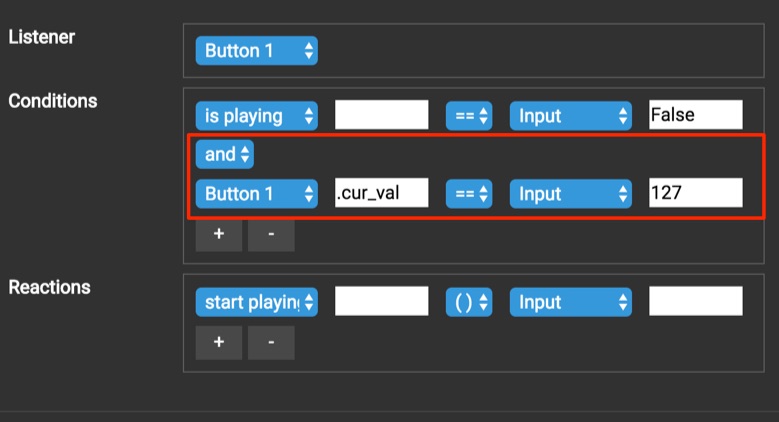 Also, make sure you set the or/and menu to 'and'. This means that both conditions need to pass for the reaction to fire.
I have attached the completed / working script to the bottom of this article. Download and import it into your CSS App and then you can simply copy it over to your script. all you need to do then is select the button you want to use in each mapping.
Also, make sure you set the or/and menu to 'and'. This means that both conditions need to pass for the reaction to fire.
I have attached the completed / working script to the bottom of this article. Download and import it into your CSS App and then you can simply copy it over to your script. all you need to do then is select the button you want to use in each mapping.

Method 1: reversing the on/off values in each mapping
This is the most simple method but note that it requires the button to be a toggle as it needs to send an On and Off velocity value on separate presses. If you are using a momentary button/pad either change it to a toggle via the controller’s own editor or see Method 2 below. The way this works is to set the Play mapping to only fire for the button's ‘On’ value and the Stop mapping to only fire for its ‘Off’ value. In your play mapping, change the ‘control’ option to custom, set ‘control type’ to on/off and make sure ‘on’ is the button’s correct ‘on’ velocity value.
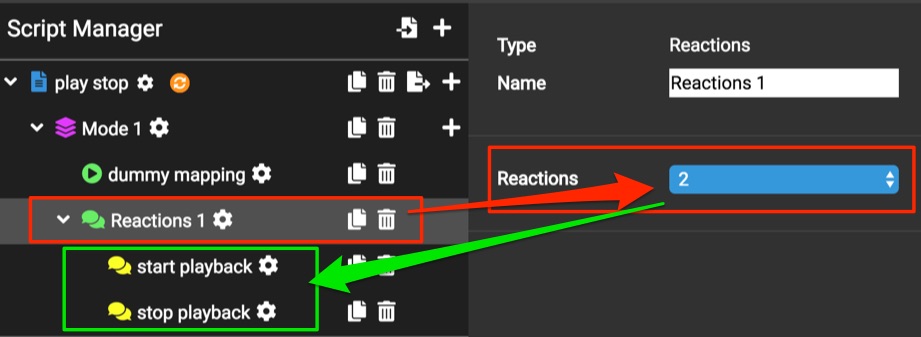
Method 2: Using Reactions to alternate between Start & Stop
With the Reactions mapping type you can also achieve this, reactions are a lot more flexible allowing you to use momentary pads/buttons to achieve similar functionality as method 1. But rather than tying Start and Stop to the button’s on/off values, for this method when we press our button we will be telling the script: if playback is active then stop playback and if playback is stopped then start playback. This will alternate between play and stop on each press of your button. Add a new ‘Reactions’ mapping and set it to create 2 Reaction mappings inside.
Continue playing from where you stopped
If you would prefer that playback continues from where it stopped rather than reseting back to the beginning, you can use the ‘continue playing’ option rather than ‘start playing’ in the ‘start playback’ reaction.
downloads:

